Welcome to the final installment of our four part series on Spray Polyurethane Foam SPF Insulation. So far we’ve discussed the what and how’s involved with the application of spray foam insulation. The articles were written in an effort to raise awareness for both consultants interested in investigating complaints associated with spray foam and for the consumer who may be interested in the application of spray foam in their home or office.
This final article will address the actual inspection of the property that has the complaint. That’s right “property” not the air or the spray foam but the property as a whole.
To be truly scientific in our approach and provide a solid foundation for our ultimate opinion, we must follow the scientific method which begins with a scientific hypothesis. A scientific hypothesis is a proposed explanation of a phenomenon which still has to be rigorously tested. The hypothesis doesn’t matter as much as the process of challenging the hypothesis to either prove or disprove the hypothesis.
For example, if you hypothesize that the spray foam is producing a nuisance odor resulting in the occupant complaint, you must then exclude all other potential contributors as well as show how the spray foam is the contributor. The mere identification of volatile organic compounds VOC’s only tells us that there are VOC’s present not where and why they are present. This wala, eureka, yahtzee, moment for some really provides no real substantive answer.
The beautiful part of the scientific approach is that you will ultimately identify the true contributor. Let’s say that I hypothesize that the ventilation is inadequate and allowing for the accumulation of the complaint odors within the property. I then have to physically inspect the applied spray foam insulation in accordance with industry standards and the manufacturer’s specifications to either include or exclude the SPF as a contributor. I then have to inspect all other potential contributors to either include or exclude potential contributors such as the preexisting condition of the attic, exhaust fans, previous insulation, rodents, insects, stored materials etc. Finally, I would need to fully assess the property’s ventilation system and establish the actual ventilation rate to include or exclude the ventilation rate as a contributor.
However you decide to hypothesize following this scientific approach to the investigation of occupant complaints associated with spray foam insulation will weed out all potential contributors and provide support for the actual contributors.
When I investigate Spray Polyurethane Foam SPF Insulation complaints I have three primary areas that must be individually addressed in each report. First is the home or building’s ventilation system and ventilation rate. Second is the condition of the occupied space and the semi-conditioned attic space. Third is the actual inspection of the installed spray foam insulation. You don’t have to inspect in that order but I personally believe any opinion rendered regarding spray polyurethane foam insulation that doesn’t include these three areas of concern will leave the client with too many unanswered questions and possibly no clear corrective action.
The first of my primary areas of concern when it comes to investigating Spray Polyurethane Foam SPF Insulation complaints is the home or buildings ventilation system and ventilation rate.
Part II began with a short explanation of the objective for installing Spray Polyurethane Foam SPF Insulation. We discussed how you aren’t just adding insulation or “R value” to your home to save a few energy bucks. Most importantly we discussed the how you would be changing your home to save those energy bucks. We talked about how the SPF will literally seal your home with the intent of preventing air infiltration and exfiltration. Infiltration is the unintentional or accidental introduction of outside air into a building, typically through cracks in the exterior walls, ceilings, attics, and through use of doors and windows. This outdoor air infiltration is often referred to as air leakage. In layman’s terms, SPF prevents unconditioned outdoor air from getting into your home and conditioned indoor air from escaping out of your home.
Your energy savings is the direct result of substantially reduced air infiltration and exfiltration due to the sealing capability of the SPF insulation. It truly is great for reducing the amount of energy bucks needed to heat and cool your home. Your home’s HVAC system now only has to contend with the newly sealed indoor environment which now includes the semi-conditioned attic.
Controlling the air infiltration in turn makes it easier for your home’s HVAC Heating Ventilation and Air Conditioning system to heat, cool, and maintain your indoor thermal comfort. That’s right, were talking about indoor thermal comfort not indoor air quality.
The discussion about the reduction in air infiltration and exfiltration led us to the necessary air exchange rate is also known as air changes per hour (ACHs) or air exchange rate. The American Society of Heating, Refrigerating, and Air-Conditioning Engineers (ASHRAE) have had a residential ventilation standard since 2003, ASHRAE 62.2. The ASHRAE 62.2 minimum ventilation rate formula was set at 7.5 cfm per person plus 1 cfm per 100 square feet.
So while your home’s recommended minimum ventilation rate remained unchanged for many  years, ASHRAE has recognized the tighter construction of today’s homes and 10 years after the initial ASHRAE 6.2, there are new changes to the 2013 version of ASHRAE 62.2. Under the new formula, newer tightly built homes will need to be ventilated at a much higher rate, namely 7.5 cfm per person plus 3 cfm per 100 square feet. This means that for a tightly built 2,400-square-foot home with 3 bedrooms, the minimum airflow rate of the ventilation equipment has jumped 89%, from 54 cfm to 102 cfm. Long story short, the 2013 version of ASHRAE 62.2 has eliminated the air infiltration credit on new tightly built homes. Guess where SPF insulated homes fall? Right smack dab in the middle of the (as designed) tightly built category.
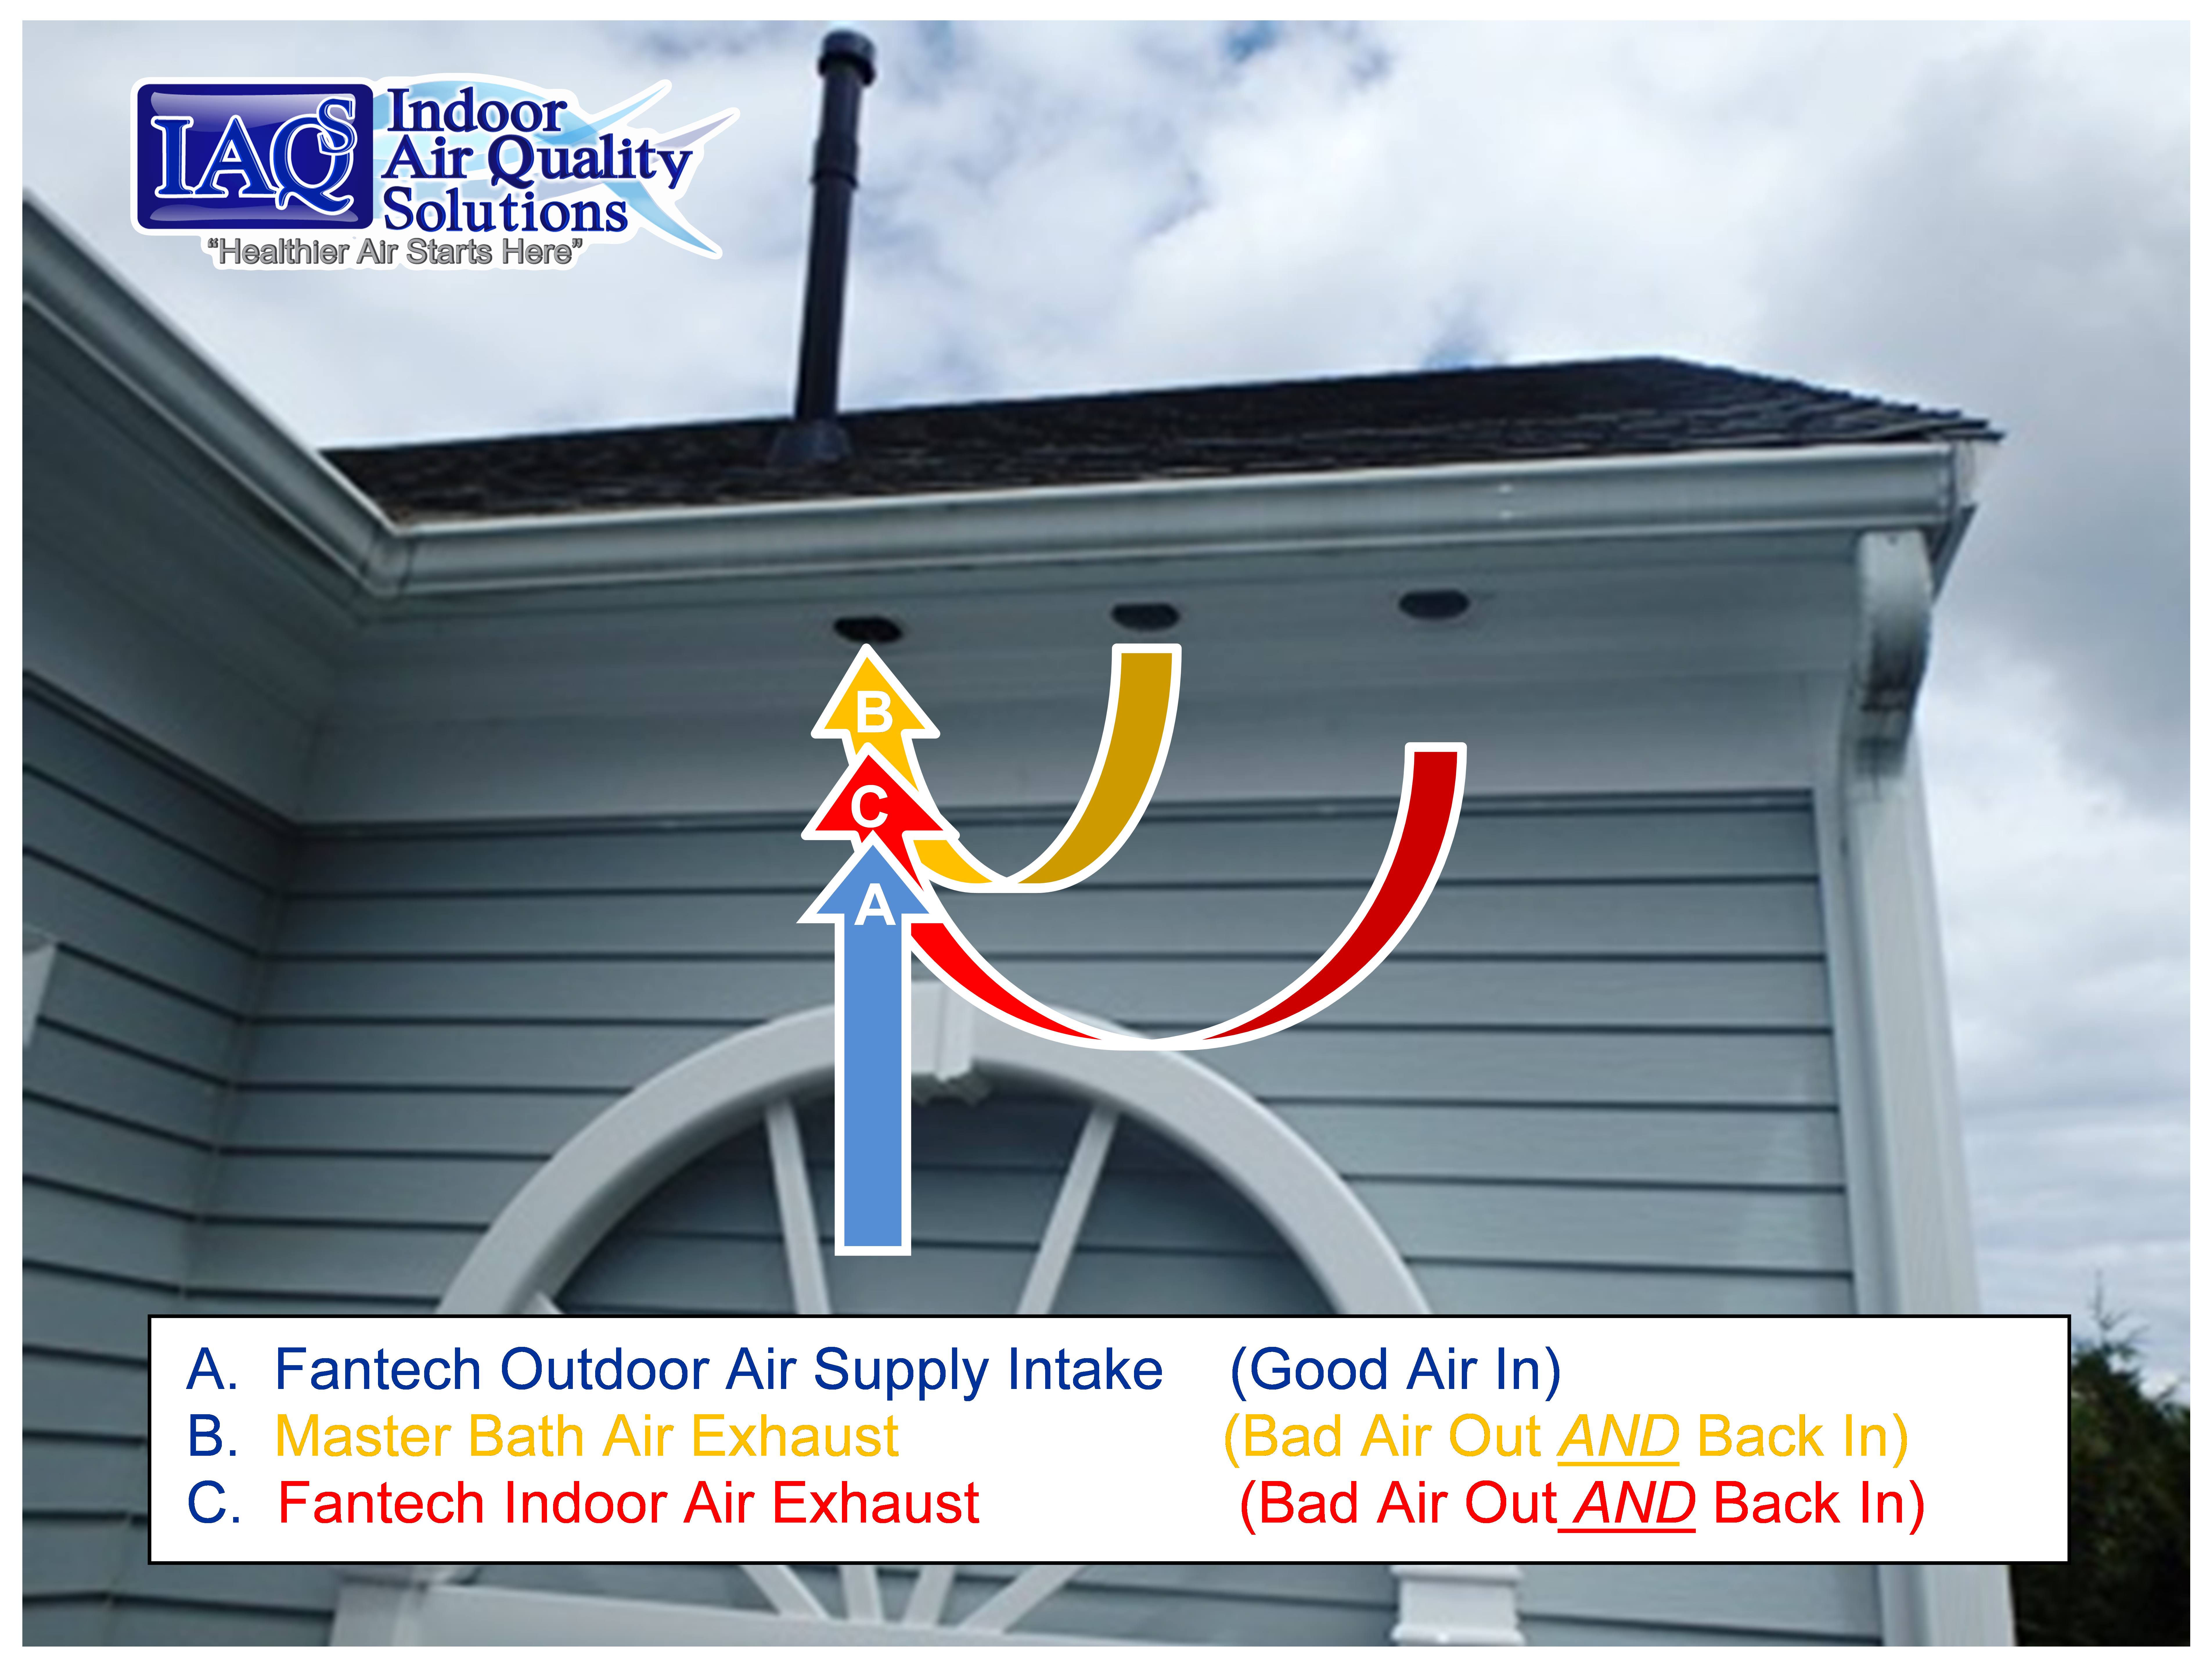
Remember this, a tightly sealed home will not meet the required ventilation rate and will require outdoor air supply. Depending on where you live, this may require the use of an ERV (energy recovery ventilator), an HRV (heat recovery ventilator), or a mechanical dehumidifier. All three will require alterations to your homes HVAC (heating, ventilation, and air conditioning) system.
This is a huge part of the investigation of Spray Polyurethane Foam SPF Insulation complaints. Well over two thirds of the investigations I conduct are the direct result or partial result of inadequate ventilation. This includes almost all retrofit applications and many new construction homes and buildings. If you intend to provide investigations for Spray Polyurethane Foam SPF Insulation complaints be prepared to also inspect the homes ventilation system. That includes knowing how to calculate the ventilation rate of the home or building and having the knowledge and ability to identify how the home or building is addressing the minimum ventilation rate set by ASHRAE 62.2.
Remember the consumer questions for SPF contractors in Part II? Questions to Ask Your SPF Contractor Prior to Install
SPF Consumer Question Number 1; How will you determine whether or not my home will meet or exceed the minimum ventilation rate once the SPF insulation is installed?
Be prepared to provide answers to this question and not just sample the air within your clients home. Any home that does not meet the minimum ventilation rate can and most often will have an elevation in volatile organic compounds VOC’s due to inadequate ventilation. Remember, dilution is often the solution.
This is where the “Final Evaluation Test Out” was discussed in Part III. This is a cornerstone of the true investigation of Spray Polyurethane Foam SPF Insulation complaints.
The Test Out air leakage testing is once again performed using a blower door to evaluate air leakage and natural ventilation after the spray polyurethane foam insulation application
The SPFA Builder’s Reference Handbook states that “If application of SPF renders the home to be insufficiently ventilated, work with HVAC contractor to add mechanical ventilation or HRV/ERV.
SPFA Builder’s Reference Handbook clearly states that “adjustments of HVAC system may be needed to:
- Achieve Good IAQ
- Meet the minimum mechanical ventilation rate via outdoor air supply and a dehumidifier or ERV/HRV
- Avoid short-cycling of AC system for proper dehumidification
- Supplemental humidification/dehumidification to control relative humidity”
To definitively establish the needs for any home once SPF has been installed where the traditionally vented attic has been changed to an unvented attic, the use of a blower door must be used to establish the home’s ventilation rate. At that point, the home’s mechanical system requirements can be properly calculated using a Manual J for load calculation, a Manual S for equipment selection, and a Manual D for proper duct design. Without the known natural ventilation rate, you can only guess at the amount of outdoor air necessary to meet the minimum ventilation rate. That is, if you have even taken the ACH into consideration and added the necessary outdoor air supply. With the known natural ventilation rate and the new R values, the home’s HAVC can be correctly calculated and designed.
So when investigating a home or building with Spray Polyurethane Foam SPF Insulation complaints treat the home or a building as a system that must work together in harmony to provide the optimal indoor environment. This must include an understanding of the home or buildings ventilation system and a thorough inspection and evaluation of the home or building’s ventilation rate.
The second of my three primary areas of concern when investigating Spray Polyurethane Foam SPF Insulation complaints is the condition of the occupied space and the semi-conditioned attic space.

This was discussed in Part II SPF Consumer Question Number 2; How will you clean my attic and prepare it to be a semi-conditioned attic space?
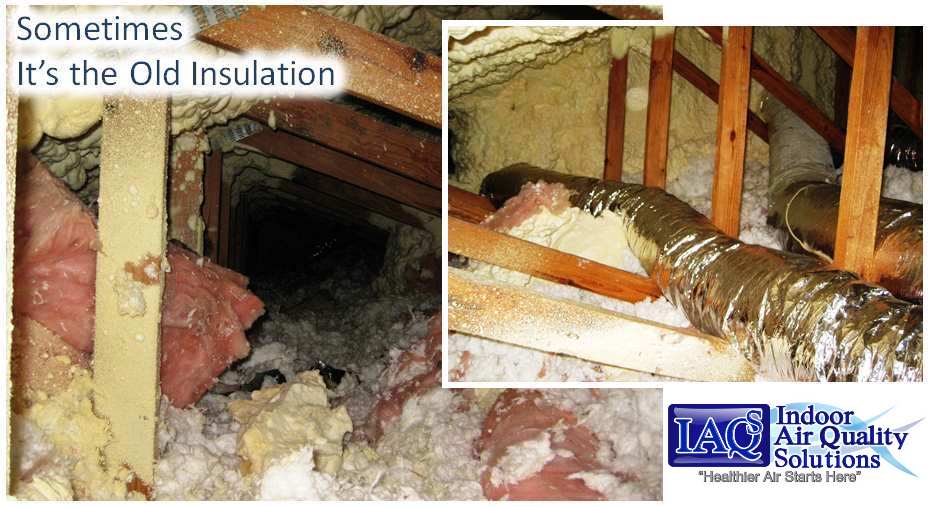
This is an area that must be taken into consideration when investigating all SPF complaints. Anyone investigating SPF complaints must take into consideration the age of the home or building and the condition of the home or building’s attic. Any home or building that is retrofit with SPF can have some rather odd contributors to occupant discomfort and nuisance odors trapped within the sealed home or building. These contributors will now become much more concentrated and obvious to occupants when the spray foam insulation is installed. Most of these contributors come from the old now sealed and semi-conditioned attic.

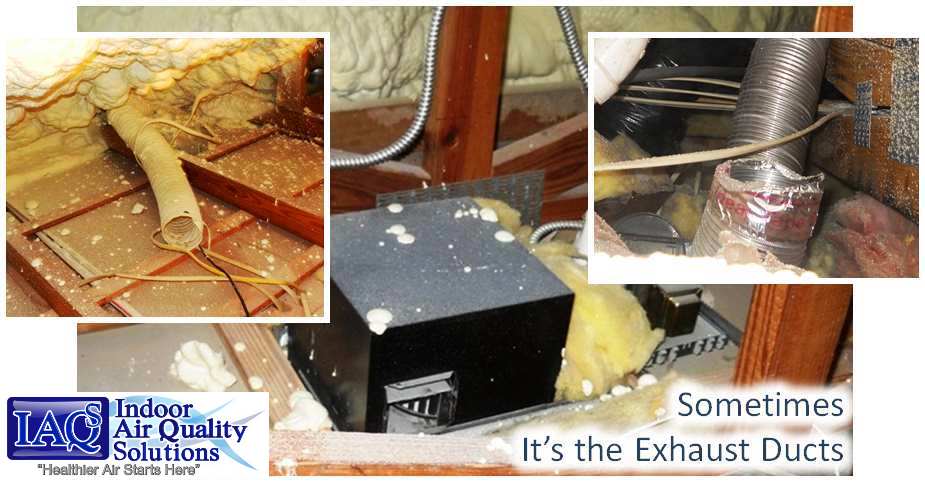
Some of these contributors to occupant discomfort include the storage of materials in the now sealed attic space, attic insects and/or rodent activity, routine pest control applications, the previous insulation including the condition and material, and the ducting of gas appliances, fireplaces, and kitchen and bath fans. The possibilities are endless and all must be considered and inspected during the investigation of spray polyurethane foam SPF Insulation complaints. Remember, what has accumulated in the attic is now trapped within the now sealed semi-conditioned attic that is now a semi-conditioned attic that shares circulated air with the occupied living space of the home.
It’s time to take a closer look at how to physically inspect Spray Polyurethane Foam SPF Insulation and how to identify misapplied Spray Polyurethane Foam SPF Insulation.
Let’s begin with a few examples of how NOT to identify misapplied Spray Polyurethane Foam SPF Insulation. Photos A and B are NOT an inspection of spray foam insulation. They are however a great example of how to spend your clients money sampling the attic air of their home or office.
Or you can actually inspect the applied Spray Polyurethane Foam SPF Insulation and identify properly applied spray foam insulation as shown in photo C or misapplied spray foam insulation as shown in photo D.

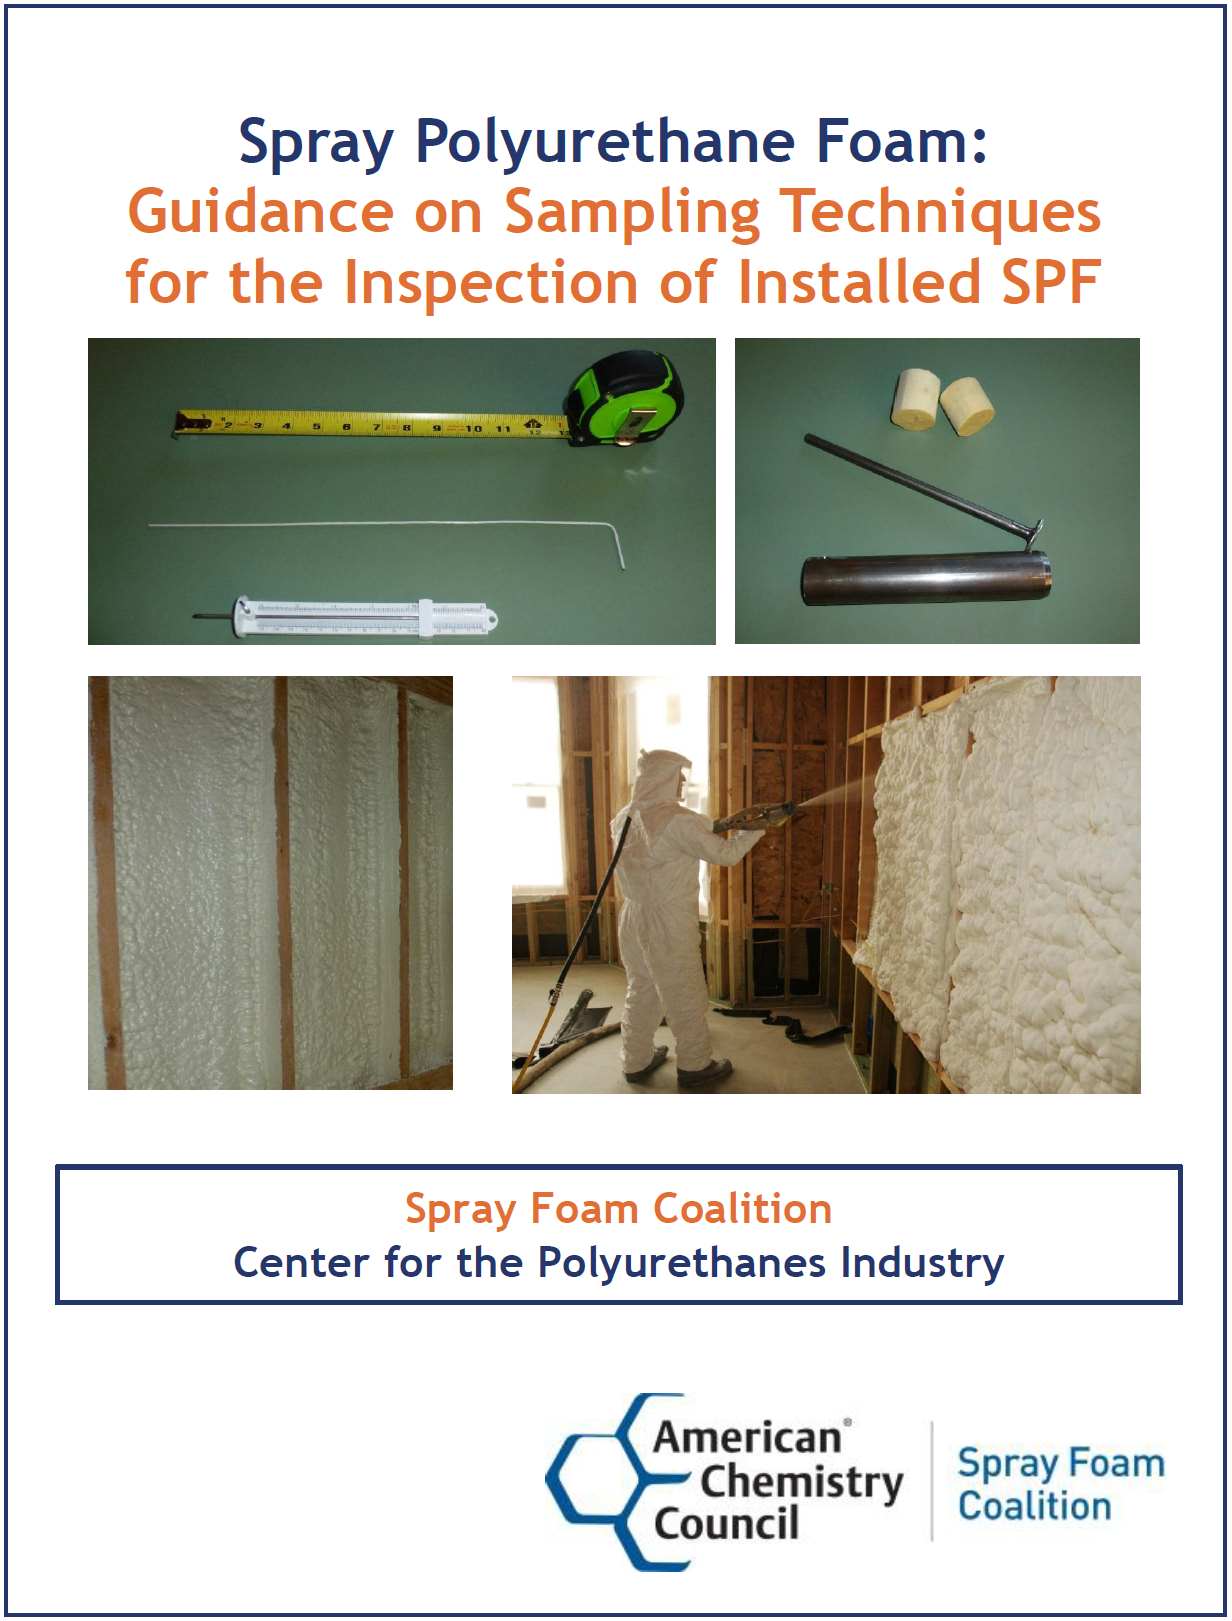
The SPF industry has guidance documents for the inspection of installed SPF. The American Chemistry Council Spray Foam Coalition – Center for the Polyurethanes Industry have published the guidance document titled “Spray Polyurethane Foam: Guidance on Sampling Techniques for the Inspection of Installed SPF”
The first step of the process would be to identify the product and how it failed. This would be accomplished by utilizing the product manufactures installation guidelines and specifications. I can’t stress this enough, an IEP that is attempting to identify how a product may or may not be impacting occupants must begin with the assessment of the product itself. Air samples identifying an elevation of VOC’s alone do not provide a source. The IEP must find the source.
With many of my clients I’m asked to review the findings of an indoor environmental professional (IEP) who has collected air samples and declared the elevated compounds to be the direct result of the spray foam insulation. Believe it or not many of these IEP’s never even set foot on the property and have never actually inspected the spray foam insulation.
Without the identification of the spray foam and the actual inspection of the applied spray foam to identify how the product is or isn’t failing and contributing to the identified VOC’s, the report is little more than biased opinion that was established prior to the collection of air samples. A very unscientific approach, a hypothesis that remains unproven and unchallenged.
The first step of the spray foam inspection process is to identify the product and its proper installation according to the manufacturer’s specifications and industry standards. Then comes the physical inspection of the spray foam insulation to determination of correct or incorrect installation. This would be accomplished by identifying the product and utilizing the product manufactures installation guidelines and specifications to assess the products condition.
The ACC Guidance on Sampling Techniques for the Inspection of Installed SPF states that the inspector should conduct a qualitative visual, tactile and olfactory inspection of the overall project. When conducting an inspection, include all information that could be useful. For example, include comments and observations of the building occupants and document the specific circumstances of any complaints, such as when, where, and under what conditions.
ACC: Spray Foam Insulation Project Characteristics
Examples of items and issues to look for can include, but are not limited to, the following:
- Manufacturer

- Product
- Primers
- Fire Retardants (Thermal and Ignition Barriers)
- Contractor
- Installation date(s)
- Building location
- Daily job QC sheets
- Type of SPF (open- or closed-cell, reported density, sealant, etc.)
Installation locations (walls, ceilings, attics, crawlspaces, under slab, rim joists, etc.)
The ACC Guidance on Sampling Techniques for the Inspection of Installed SPF begins with documenting the SPF Substrate Characteristics. Generally describe to what materials the SPF has been applied. Examples would be: plywood, oriented strand board (OSB), gypsum wallboard, masonry units, brick, among others. Since substrates vary considerably within a given project, note as many as can be identified and which substrates cover large areas versus those that cover small or minor areas. Also, note any substrates where defects, if any, are observed. Use professional judgment to determine what other characteristics may need to be noted.
The ACC Guidance on Sampling Techniques for the Inspection of Installed SPF requires the documentation of Visual Observations. Visual observations are those that can be seen with the naked eye. Visual observations can reveal overall characteristics of the project and some defects. Please note this is an example of what to look for during an inspection and some defects can only be identified from a core sample. Examples of detectable defects by visual observations may include the following examples:
- Cracks – Cracks are characterized by a foam-to-foam cohesive failure. Their appearance may be random or patterned.
- Surface Appearance – SPF typically appears relatively uniform in color and surface profile. These topics are discussed in more detail in later sections. The SPF surface may be shaved or sanded (wherein the surface will be relatively flat) or the surface may have its top skin in place (resulting in an undulating surface appearance).
- Shrinkage – Shrinkage manifests itself as cracks or crevasses as a result of either cohesive (e.g., cracks within the mass of SPF) or adhesive (e.g., cracks between the SPF and a stud or substrate) failure. Shrinkage resulting in cracks is considered a defect and is often documented in inspections

- Gaps and Voids – Gaps are unintentional openings in the thermal envelope which may permit excessive heat transfer. Examples include areas mistakenly not sprayed or sprayed too thin or areas where shrinkage has left gaps between the SPF and a stud or substrate. Gaps are considered defects and are documented in inspections.
- Voids are uninsulated air spaces within building assemblies caused by the installation of interior (or exterior) finishing material over an otherwise satisfactory SPF surface. An example of a void is the air space resulting when a building assembly’s R-value may be met without completely filling the cavity with SPF.
- Mechanical Damage – The SPF surface may become damaged as the result of mechanical damage (e.g., it was inadvertently struck by a tool or fork lift). Such damage would be considered a defect and documented accordingly in an inspection.
It is also very important to document your Color Observations of the spray foam insulation. Document the overall surface color and note differences where observed in the color of the SPF. Overall – SPF color is variable for a number of reasons, including the following:
- Some manufacturers add colorants to their formulations for identification or marketing purposes. Unless pigmented or dyed, SPF color can be described as tan, beige, or buff in most but not all situations.
- SPF’s raw materials (e.g., A- and B-side components) can vary in color and affect foam color.
- UV radiation (sunlight) exposure tends to darken the color of SPF to an orange or rusty coloration, which is discussed further under On-Site Qualitative Examination.
- Uniformity – While SPF color varies, unless different SPF products have been applied, the color is likely to be relatively uniform throughout the project. This is not always the case. UV degradation can be an exception to this.
- Blotchiness – An Inspector may observe blotchiness on the surface of SPF as either an irregular dark or a light patch. This can be due to a number of factors, which could include: off-ratio foam, dark foam lacking B-component, light foam lacking A-component. See the discussion on Off-Ratio Foam below.
- UV Degradation – Ultra-violet radiation (such as from sunlight) can degrade and darken the exposed surface of SPF. The degradation occurs on the surface, whereas the interior of the SPF mass is not affected. The SPF surface tends to turn an orange or rusty color. After prolonged exposure, the degraded foam surface typically becomes dusty and friable.
Poorly applied spray foam insulation will also have areas of delamination of blistering. The guidance document requires the inspector to look for and document the identification of delamination or blistering. Delamination occurs when the bond between the SPF and the substrate or a prior foam pass is broken. A blister occurs when the effect of the delamination is an uplifting or bulging of the foam surface. Frequently, the cause of either one can be a weak adhesive bond between the foam and the substrate or between the foam and the prior foam pass.
Small, isolated delamination’s or blisters may not present a defect sufficient to impact the SPF’s performance. Widespread, large delamination’s and blisters could affect performance and may be symptomatic of application or material defects.
Blisters typically can be seen and verified by touch: they may have a slight give to them whereas a bulge created by solid SPF will be firm. Delamination’s typically can be identified by lightly tapping the SPF surface with an open palm; a hollow feel or sound is indicative of a delamination.
What about the odors associated with the occupant complaint? How do we document the odor? Well we document exactly how the client describes it word for word. Then we document what we smell as specifically as possible. Remember during SPF applications, odors are common and normal. During retrofit applications, existing problems prior to the installation of SPF, such as moldy or mildewed carpets, wet ducts, or existing insulation, may be accentuated by the tighter building envelope that results from the application of SPF. Once the project is completed and the spray area ventilated, odors generally dissipate. Lingering odors may be the result of several factors and can be a combination of numerous sources, making it difficult to identify them. Sources of odors in new construction and retrofit applications can include: SPF; other construction materials, such as paints, cleansers, lumber, finishing treatments; occupant life style; nearby industrial or other emissions; pre-existing (“old house”) odors; construction defects, such as misrouted plumbing vents; or high individual sensitivity.
Odors may be noticed within areas of the building, for example, specific rooms, or when taking or examining a sample. Document the presence of odor, describe its characteristics with specific adjectives such as “fishy,” or “rotten egg,” and where and under what conditions it was noticed.
Documentation of these qualitative observations can include photos (visual items) and notes. When conducting an inspection, include all information that could be useful. For example, include comments and document the specific circumstances of any complaints, such as when, where, and under what conditions.
At this point in the inspection, we haven’t measured the spray foam insulation thickness or removed any of the applied spray foam insulation to inspect the product itself. We’re just documenting our visual and olfactory observations of the exposed areas of the spray foam insulation. For the spray foam insulation to be properly installed, the contracted and specified thickness must be documented. I often find that the areas of the thickest spray foam insulation to be the areas where I want to take a sample. If the product is the applicators commodity, then they aren’t going to apply more than they need. That is unless they are covering up an area that may not look so good or was misapplied.

Table 1: Examples of Thickness Probe Frequency

Now that we’ve measured the applied spray foam insulation we can move on to the collection of the samples. I collect two foot by two foot samples at the roof or truss to truss, rafter to rafter. On a wall or gable I sample stud to stud or typically sixteen inches by sixteen inches. These larger samples will allow me to easily view the spray foam characteristics necessary to properly inspect the spray foam.
These next areas of the inspection cannot be identified without the actual sampling of the spray foam insulation. This is by far the most critical aspect of the spray foam insulation inspection.
- Streakiness – Document the presence and extent of visually detected streakiness, such as darker then lighter SPF within the same sample area.
- Scorching – Scorching may occur when the SPF becomes excessively hot during its application and cure phase. When SPF’s exothermic reaction results in the foam getting too hot for too long a period of time, the foam may degrade, resulting in scorching indicated by a brownish discoloration.

- Foam Profile (Cross-Sectional) – Core samples are normally extracted to provide a full-depth sample of the SPF, from its substrate to its top skin surface. Within this cross section, knit lines may be evident indicating the number of passes or lifts, and the thickness of those passes.
- Cell Structure Consistency – When visually examining an SPF core sample, the foam profile (substrate to surface) is typically uniform and the cells are small and consistent. The cell structure is tight, small and consistent at the substrate interface and on either side of knit lines.

Potential cell structure defects could include the following:
- Internal voids: A large cell forming within the SPF mass, which may be due to air entrapment. These may constitute a defect if the internal voids are large or frequent enough to significantly affect the SPF’s performance (Figures 16 and 17).
- Open, irregular cells: A layer of open, irregular cells may be an indication that moisture was introduced or present on the substrate. If extensive, this can lead to structural failure of the cell layer, blistering and/or delamination (Figure 18).
- Elongated cells: Isolated, occasional elongated cells that are visually detectable do not normally constitute a defect. If extensive, then consider documenting
- Knit-line Adhesion – When SPF is applied, it forms a surface skin which is typically denser than the core of the foam mass. When SPF is applied to an existing SPF surface, the adhesion of the subsequent foam pass forms a knit line with the first pass. Normal knit lines are strong, exhibiting excellent adhesion.

- Off-Ratio Foam: Stickiness or Brittleness – Typically, commercial SPF insulation systems are designed to be applied in a one-to-one ratio (by volume) of the A- and B-components. Malfunctions can occur that could upset the SPF ratio, such as line or strainer blockages, running out of one material and pump cavitation.
Off-ratio foam is normally classified by the lacking material, thus off-ratio foam may be said to be “B-side lacking” or “A-side lacking.” Opposite jargon is also used: “B-rich” or “A-rich.” Off-ratio SPF may not provide the same physical properties of on-ratio SPF. In the field, off-ratio foam at times can be identified by its color and feel, but there are exceptions. Table 3 below provides some general characteristics of off-ratio SPF. The SPF manufacturer can also provide additional guidance for the specific SPF being used.
Table 2: General Characteristics of Some Off-Ratio Foams

Odor – Odors may be noticed while extracting samples or within the sample. Document the presence of odor and describe its characteristics with descriptive words such as “fishy” or “rotten egg,” along with other sample documentation.
This information is straight from the ACC Guidance on Sampling Techniques for the Inspection of Installed SPF. This provides all who intend to investigate occupant complaints regarding spray foam insulation an industry reference document to support their method and ultimately their findings. If you follow the guidance document and approach your investigation scientifically you will be surprised at what you will find and how well you can support your findings.
In my experience, spray polyurethane foam insulation investigations can be categorized in three distinct categories. The first two seem to be the primary areas of spray foam insulation investigations. The first area is simply miss-applied spray foam, the second is pre-existing of recently introduced contributors, and the third would be is exposure and sensitization.
The First Category – Misapplied SPF
These complaints and nuisance odors are directly associated with incorrectly applied spray polyurethane foam SPF insulation and can be addressed by either correcting the areas of misapplied foam or by removing and re-insulating the areas. Misapplied includes improper ventilation during the application, incomplete application, off ratio application, and also includes SPF in direct contact with recessed can lights in the attic, keyless light fixture bulbs, dryer vents, and/or chimney flues, all of which can heat the SPF and cause a tremendous amount of chemical odors.
Category 1 is relatively cut and dry and requires the onsite inspection of the SPF and the collection of no air samples. The inspection of the foam and the determination of correct and complete installation is a critical step.
The Second Category – Preexisting or Recently Introduced Contributors
This category cannot be stress enough to the professionals that are investigating SPF complaints.
This category runs the gamut and can include some rather odd contributors to occupant discomfort and nuisance odors that become much more concentrated when the SPF is installed. These include the HVAC system, air exchange rate, storage of materials in the now sealed space, insect and or rodent activity, routine pest control applications, the previous insulation condition and material, proper ducting of kitchen and bath fans. The possibilities are endless and all must be considered. Remember that what has accumulated in the attic is now semi-conditioned air that is shared with the attic and living space of the home.
It may not be the SPF insulation that is producing the odor or contaminate that is causing occupant discomfort. However, the SPF insulation may well have eliminated the natural ventilation of the attic which prevented the odors and contaminants from entering the home. The SPF insulation may be trapping the odors and contaminants within the semi-conditioned space. This area must be thoroughly investigated to rule out the possibility that the home is accumulating VOC’s due to inadequate ventilation.  IEP’s must remember that while the SPF insulation may be the issue unless you can exclude all other issues within the home you haven’t completed your investigation, you’ve just begun.
The Third Category –Sensitization Due to Exposure
This category includes all occupants who have become sensitized or allergic to the chemicals produced during the application of SPF. With sensitization, occupants have either re-entered the property shortly after the foam is applied, well before the manufacturer recommended re-occupancy time of 24 to 48 hours while the SPF insulation is still curing and off-gassing, or in the most severe cases of occupant sensitivity the exposure actually took place during the application of the SPF insulation.
Sensitization of the occupants can be a result of many issues such as occupants that don’t want to spend the money for a hotel stay, early re-entry or occupancy, to the curious application observer. Occupant sensitization can also be the result of the lack of proper ventilation during the application. Venting of the off-gassing of the SPF insulation during application is critical and often not conducted at all. In all cases of occupant sensitization that I have been involved with, the SPF insulation application was not properly vented to the exterior which created a substantial accumulation of the off-gassing chemicals within the property. These trapped volatile organic chemicals VOC’s are what sensitizes the occupants who have either re-occupied too early or were present during the SPFI application.
Sensitization occurs when the occupants are overexposed to the trapped volatile organic chemicals VOC’s and become sensitized. From that point on, any exposure to even a minute amount of the chemical causes a reaction. The process of sensitization can make a home unlivable for people who become sensitized.
Homes that have improper ventilation during the application process of the SPF insulation are also included in the miss-applied category and almost always have identified areas of miss-applied SPF insulation (SPFI).
This category is unique in that any attempt at reducing the occupant’s exposure to the SPF insulation that they are now sensitized to may not be of any relief. I have had no luck in providing sensitized occupants relief from the home they are now sensitive to. I have been involved in everything from the introduction of outdoor air through a pre-filter and dehumidifier to control the temperature, humidity, particles, path, and pressure to full removal of the SPF insulation.
Unfortunately that bell can’t be un-rung.
I hope this series of articles has helped you better understand spray polyurethane foam insulation and the unique changes that take place when SPS is installed. If you follow the ACC, American Chemistry Council Spray Foam Coalition: Guidance on Sampling Techniques for the Inspection of Installed SPF” and approach the investigation scientifically you will be able to provide your clients a very beneficial opinion and report.
Keep an open mind and remember “It’s not always the spray foam insulation.”
About Indoor Air Quality Solutions & Microshield Environmental Services, LLC
Since 2001, Florida residents have turned to the indoor environmental experts at Indoor Air Quality Solutions & Microshield Environmental Services, LLC. The family owned and operated companies, based in the Orlando area, offer a comprehensive approach to identifying and correcting comfort and indoor air quality problems. Their expert staff utilizes the latest technologies and industry recognized standards to identify and resolve indoor environmental issues.
John P. Lapotaire, CIEC
#IAQS
Share this with the #IAQS:
 I want to be clear that the restoration industry is dedicated to quickly responding to those in need during some of the most difficult times. These trained professionals are on call 24 hours a day and have the equipment and training to restore any property to its pre-loss condition. However, there are those that look at a loss as little more than an opportunity to make money with little or no consideration for the property owner.


 Posted by John P. Lapotaire, CIEC


 Many across Florida have been directly impacted by the recent storms that wreaked havoc on our beautiful state.